Transfer everything from old computer to new computer with Windows 11
Transfer programs and files to new computer
Transfer files from one computer to another
Transfer Microsoft Office to new computer
Restore programs and files from a broken or dead computer
Transfer directly from an old hard drive
Transfer to new computer using a USB hard drive
Corporate Windows 11 migration
User Profile Migration to new PC / new domain
How To Migrate Local Profiles to Azure AD
Migration to Server 2019 / 2016
Transfer everything from old computer to new computer with Windows 11
Transfer programs and files to new computer
Transfer files from one computer to another
Transfer Microsoft Office to new computer
Restore programs and files from a broken or dead computer
Transfer directly from an old hard drive
Transfer to new computer using a USB hard drive
Corporate Windows 11 migration
User Profile Migration to new PC / new domain
How To Migrate Local Profiles to Azure AD
Migration to Server 2019 / 2016
Transfer programs and files to new computer
Transfer files from one computer to another
Transfer Microsoft Office to new computer
Restore programs and files from a broken or dead computer
Transfer directly from an old hard drive
Transfer to new computer using a USB hard drive
Move To New PC - Compare Options
Migration Kit Pro - Advanced Transfer
Transfer programs and files to new computer
Transfer files from one computer to another
Transfer Microsoft Office to new computer
Restore programs and files from a broken or dead computer
Transfer directly from an old hard drive
Transfer to new computer using a USB hard drive

Updated February 2026 · 4 minute read
How to Migrate a Physical Server to the Cloud (Azure, AWS) – Applications and Data Included
Moving a server to the cloud? Here is the direct answer: yes, you can migrate a physical Windows Server directly to a cloud VM – applications, databases, settings, shares and data included – without rebuilding it from scratch. This tutorial shows the full process, whether your destination is Microsoft Azure, Amazon AWS (EC2), or any other cloud provider.
We will be performing a native migration, not OS virtualization: the end result is a “normal” cloud server, running a clean, current Windows Server – with the application stack, databases, profiles, shares and data from the original physical machine. The approach is the same for any source, from Windows Server 2008 through 2025, physical or virtual.
The goal of this tutorial is to complete the migration in less than 4 hours of “attended” time (total time will be longer, mostly spent on data transfer and automated deployment on the target).
Video demo – automatic server migration tool
In a nutshell: Physical to Cloud (P2C) server migration
Before we dive into the detailed process, here is what the migration involves:
- Capture the physical server into a migration container, using Zinstall WinServ. The container is a complete capture of the server contents (complete except anything you decide to exclude).
- Make the container accessible from your cloud server – upload it to your cloud storage or to the target server itself, or create a VPN / tunnel connection between the two servers.
- Deploy the contents of the container onto the target cloud VM – WinServ automatically deploys the applications, settings, databases, shares, profiles and data onto the target.
- Post-migration adjustments – config files that reference the old server name, DNS entries pointing to the replacement server, and so on.
Before you begin: audit, schedule, back up, provision
Audit your server: figure out what is on it, which clients it serves, and which interfaces they expect. Interfaces are especially important – after the migration, clients should find the new server exactly where they expect the old one.
Provision the target VM: create the cloud VM (Azure, AWS EC2, or your provider of choice) with a clean, current Windows Server – 2025 or 2022 – sized to match or exceed the physical server’s CPU, RAM and disk.
Schedule your migration window: migrations take time, and users may be affected. If possible, run the actual migration after hours or over a weekend.
Verify your backups are up to date – and actually restorable. Any major operation can go wrong; a valid backup is the safety net.
How to migrate from a physical server to a cloud server
Part 1: Capture the physical (source) server into a container.
- On the physical server (your migration source), run Zinstall WinServ.
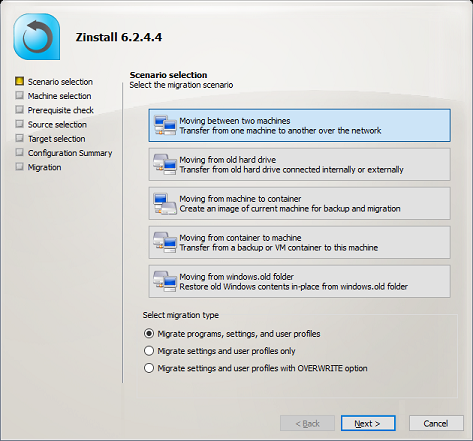
- Select the 3rd option, “Moving from Machine to Container”.
- Choose the container location (a network share, a NAS, a USB hard drive – any storage with enough space), and press Go to perform a full capture of the source server.
Part 2: Make the container accessible from the cloud (target) server.
Either upload the container to your cloud provider’s storage (or directly to the target VM), or set up a VPN / tunnel connection between the servers.
Part 3: Deploy from the container onto the cloud (target) server.
- On the cloud VM (your migration target), run Zinstall WinServ and select the 4th option, “Moving from Container to Machine”.
- If you do NOT want to transfer programs, and only need profiles, data and shares, switch to “profile and settings only” mode on the main screen.
- Specify the container location (see Part 2).
- To select exactly what to transfer, press the Advanced menu; to transfer everything, just proceed.
- Click Next, then Go, to start the migration. The transfer takes a while (depending on data volume) and reports when done.
That’s it! You have just migrated the applications, settings, profiles, databases and files from your physical server to the cloud.
Server roles and incompatible applications
Two aspects are not covered by the automated migration above: server roles (DC / AD, IIS, DNS, DHCP), which are recreated natively on the target and configured rather than migrated, and known-incompatible applications. Handle both the same way you would in any server-to-server migration – see also upgrading Server 2019 to 2025 and physical-to-virtual (P2V) migration, which follow the same pattern.
After the migration
- Adjust your domain’s DNS to point to the new server where needed (for example, the CRM-SERVER entry now pointing at the cloud VM), plus login scripts and GPO policies.
- Launch every application and console you use, and verify they load correctly.
- From a client workstation, verify clients can access the migrated server and their applications run without issues.
Congratulations! Your P2C migration is now complete.
Can you migrate a physical server directly to Azure or AWS?
Yes. You do not need to convert disk images or rebuild the machine: capture the physical server into a container, make the container reachable from the cloud VM, and deploy. The applications, databases, settings, shares and data arrive on a clean, current Windows Server running natively in the cloud.
Do the applications survive the move to the cloud?
Yes – that is the point of this approach. The applications arrive installed and configured, with their databases and settings, rather than being reinstalled by hand. The exceptions are server roles (recreated natively on the target) and applications with known compatibility restrictions.
Ready to move your server to the cloud - applications included?
Looking for evaluation licenses / volume pricing / more information?
Email us at sales@zinstall.com for assistance.
Note: The software used in this tutorial, Zinstall WinServ, is also available from IBM Services as part of their full service package for large scale deployments. Contact your IBM account team in your region for more information.
Related Guides
guarantee Buy now